We've lost 3 of those hens in that time. The hens escaped the run once when our neighbor was 'chicken sitting' while we were out of town. He wrangled them up and thought he had secured all of them back in the run. When we returned we noticed we only had 7 chickens. We later found the remains of that 8th chicken near our wooded creek bed. Yeah, I'm certain she was eaten by a fox or coyote or some other critter. Then, this past fall, while Techno was away for work in Ohio, raccoons infiltrated our chicken run. We had gotten 'lazy' in our chicken keeping practices. Up to that point we had no problems with predators. The coons dug under our run and killed 2 more of our hens over the course of a couple days as we were trying to shore up the holes they made.
Yes, we learned our lesson and now close up the coop EVERY night AND we made further adaptations to our chicken run to prevent critters from getting in. So far, it's working, but we're still not taking chances.
So, here we are, current day. We are down 3 hens. We're only getting 2-3 eggs a day and the kids and I have wanted to get our own chicks for some time. Since we moved here, actually. :-)
Techno finally agreed. We can replace the hens we lost plus a few extra for good measure. (Not sure those were his exact words, but....)
To raise these baby chicks, we needed a brooder. Store bought ones can be pricey and the only ones I found nearby were simple cardboard 'rings' of sorts.
I began my search for DIY brooders.
Pinterest is my friend. (Techno's? Not so much.)
I found several ideas; read several opinions; went back and forth from a big 'kiddie pool' set up to a rubbermaid bin set up.
I settled on the Rubber Maid bin idea simply because it's more storable for future use and would take up a bit less room than a big 'ol kiddie pool on the back porch while the chicks grow.
Once I had my 'plan' I quickly decided this would make a GREAT 4H project and asked the kids who wanted to help and have it be their poultry project. Since Trinity didn't yet have a plan for poultry, she won the prize.
First, we started our search for bins. We wanted clear, but it had to be decent sized. Finally, at Walmart, we found something we decided we could live with. We really wanted something bigger so the chicks could 'grow' in it, but ended up just buying two in case we needed to expand over time.
Next, hardware wire. Easy to pick up at Ace Hardware.
Then the heating lamp. (We already have the red bulbs from our chickens and rabbits.)
Finally a thermometer.
The rest of the components for constructing our chicken brooder we had at home. Stapler, wire cutter, a hook and wire to make a latch for our 'door'. We also picked up a feeder and waterer to add when the brooder is complete. Paper towels are almost always on hand.
 |
| The bin, lid, lamp, wire, thermometer, knife, zip ties (because you just never know), and hooks. The supplies we bought for our DIY chicken brooder box. |
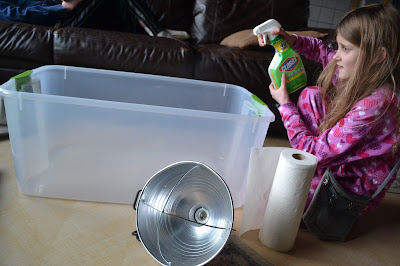
Before we could begin, we needed to clean the bin. Trinity got right to work on that.
 |
| She was so excited about making the brooder, she didn't even mind cleaning. |
At last.... We can start construction!!
 |
| The hole and the piece we cut. |
 |
| Trinity helped with the cutting |
Then we cut the hardware wire slightly bigger than said hole. The easiest step so far. Just had to watch those sharp edges.
 |
| Trinity cutting the hardware wire. |
 |
| A pretty good fit. |
Finally, we
 |
| Adding the duct tape to secure the wire. |
 |
| As you can see -- not a 'pretty' opening. Duct tape added to keep the chicks from being scraped on the ragged edges. |
Not perfect, but......
Our door!
 |
| Looks better closed than open, but... either way, it works. |
The food tray was put inside along with the waterer - both elevated slightly to keep them fresher and cleaner longer. We'll add some small decorative glass rocks in the bottom of the waterer to keep those little chicks from drowning. The thermometer was fastened to the side wall near where the heat lamp will be mounted to monitor the temperature inside the brooder.
 |
| It looks so small once everything is put inside. Guess it's a good thing we bought 2 bins. Me thinks we'll be making another one of these in the near future. |
We're considering also adding some branch 'roosting' bars along the width of the bin on one side just so those little babies can practice that all important task of roosting. To do so, we'll cut a couple branches to size then screw them in from the outside or the bin directly into the ends of the branches - securing them nicely. We'll stagger the heights so the chicks can hop and choose where to roost.
The girls think it would be fun to add a feather duster under the wire opening to mimic that of a mama hen. If I can find one, I'm game. We'll simply fasten it to the wire top and hang it down just above the floor of the bin. Wouldn't it be adorable to see the chicks huddled under a feather duster, keeping warm as they sleep?
 |
| The final product, in all it's green glory. |
Now all we have to do is wait for our chicks. Hopefully later this week we'll add them to our little brooder.
No comments:
Post a Comment
I only check comments for spam.